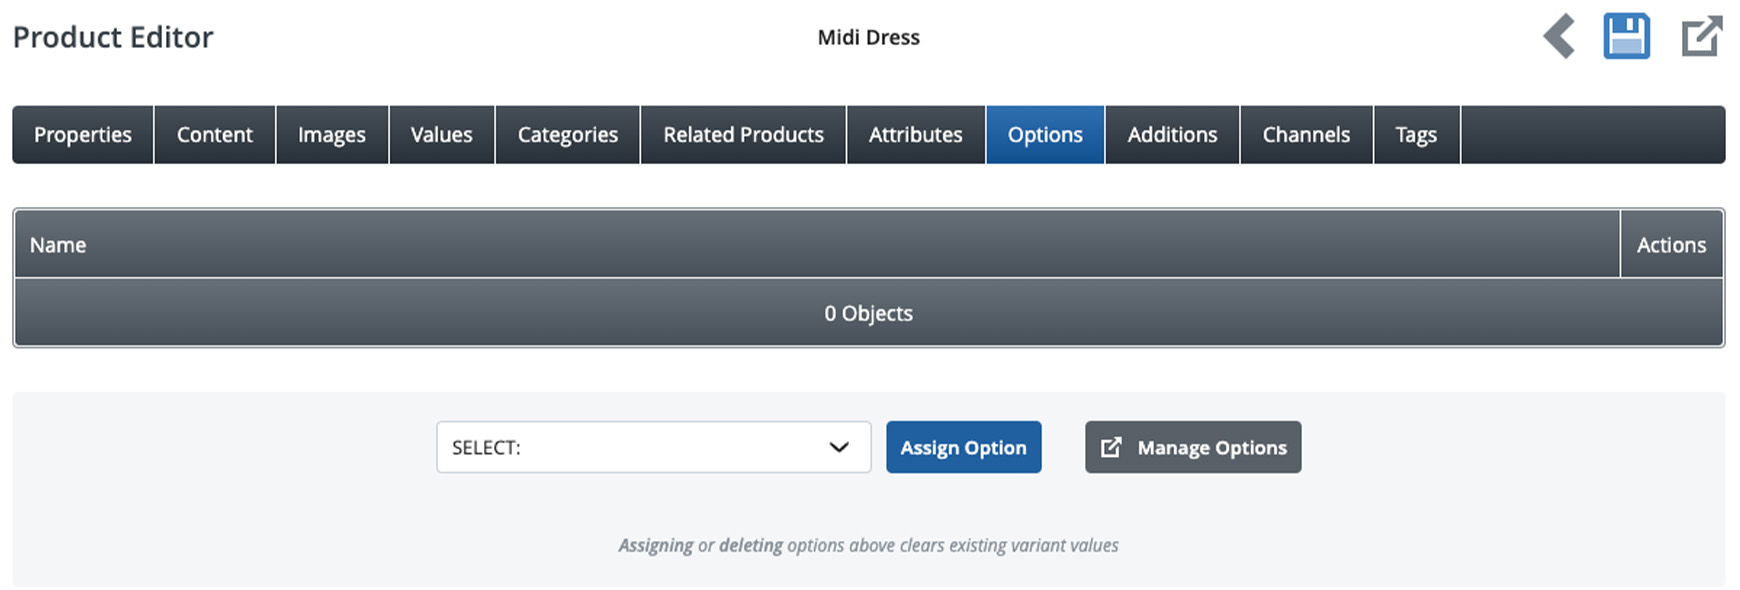
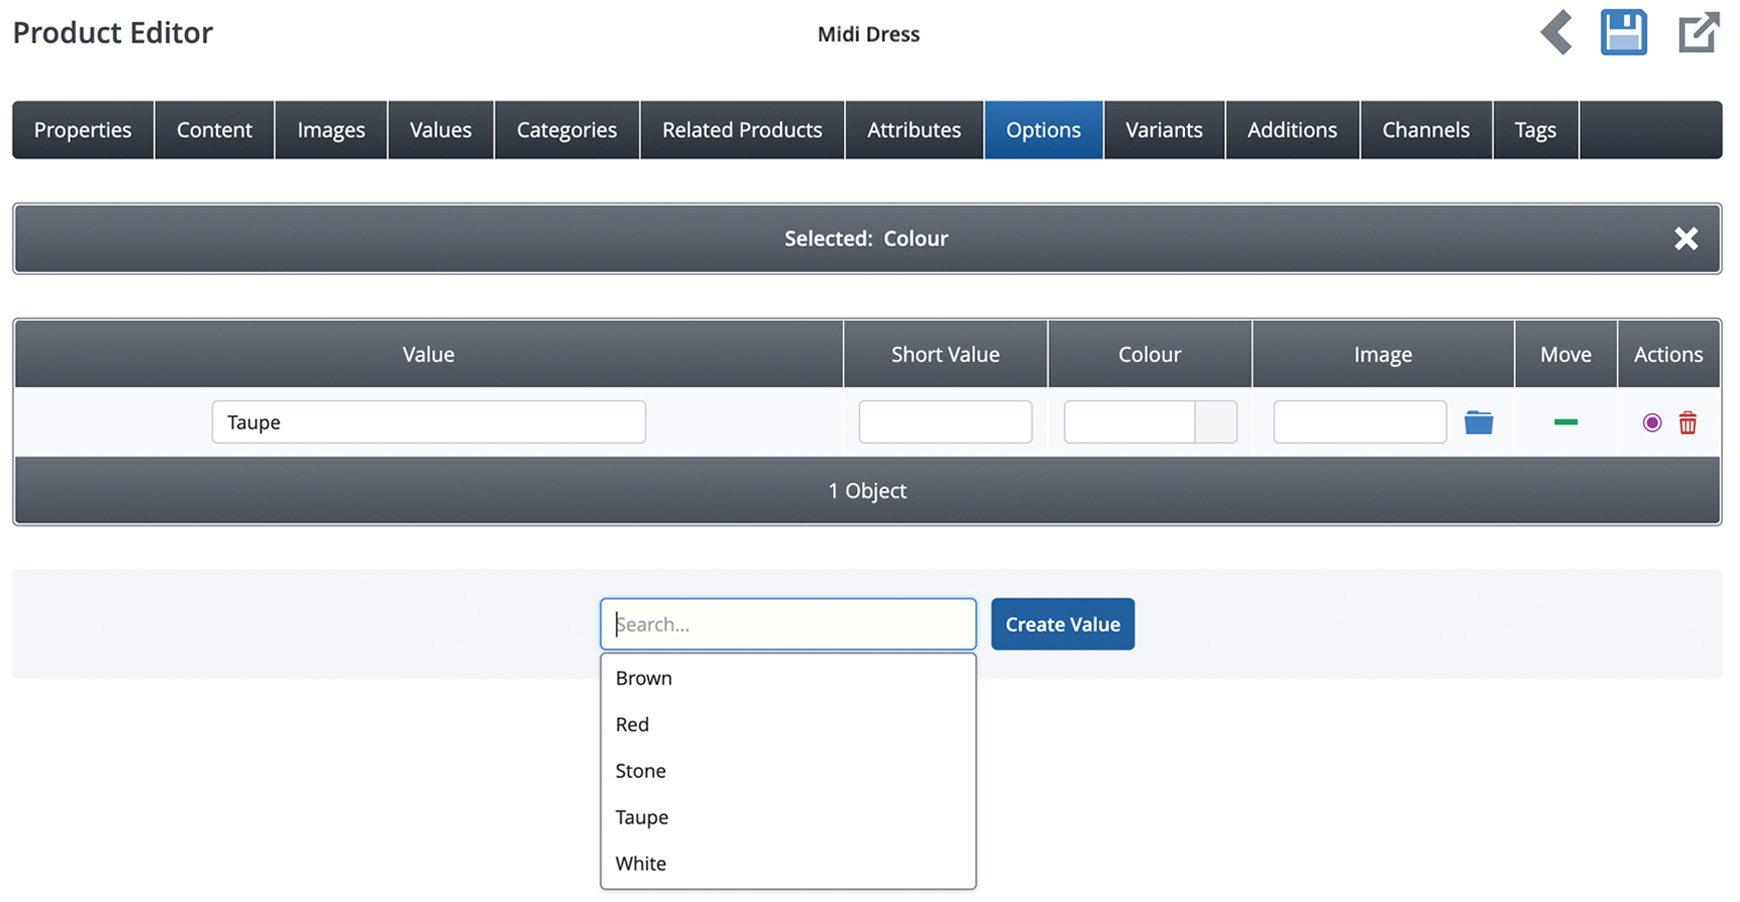
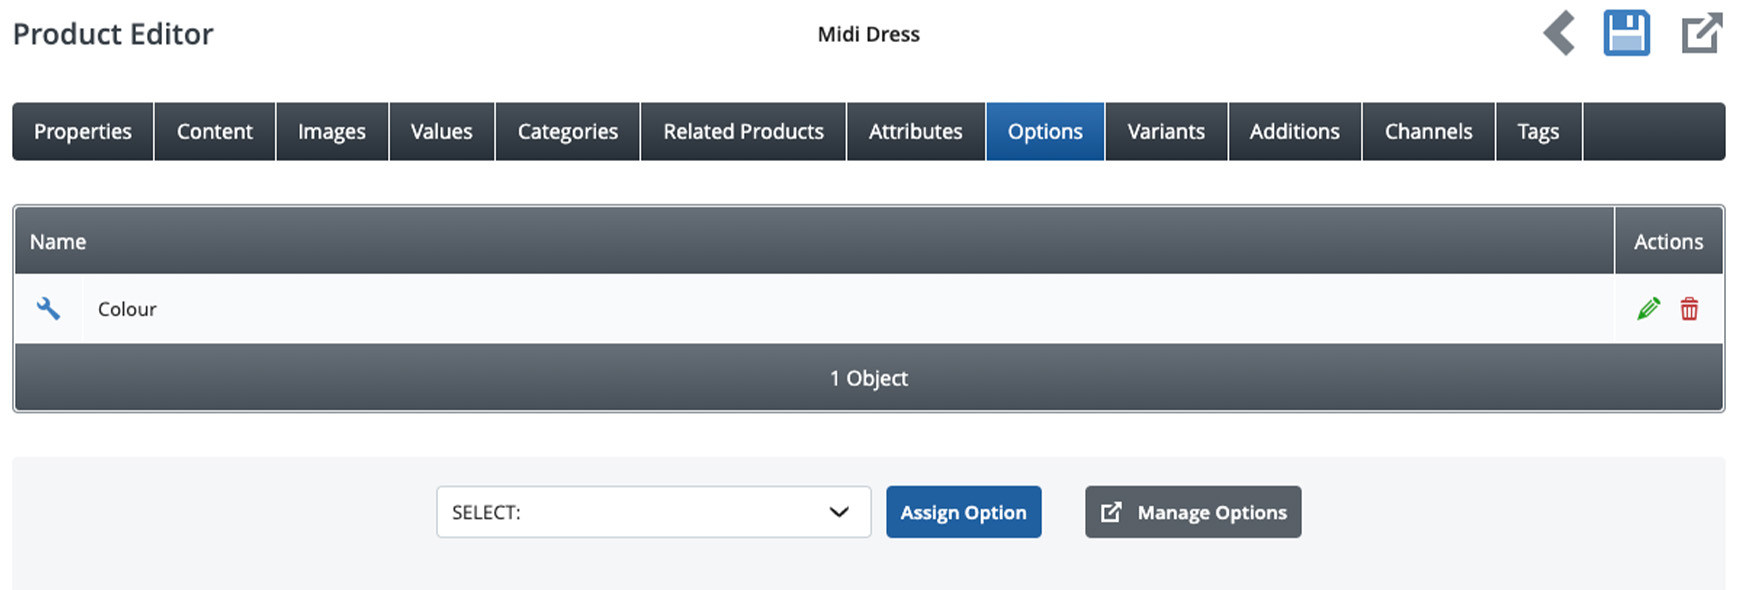
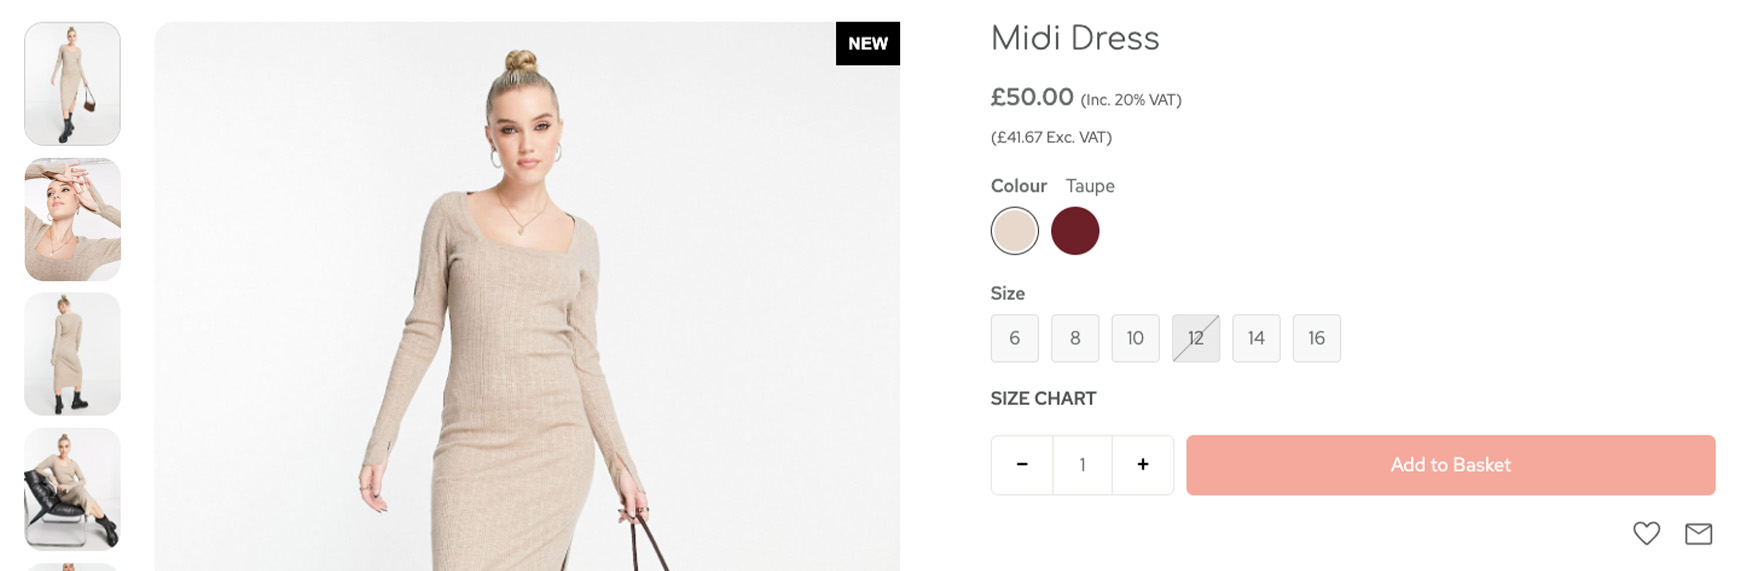
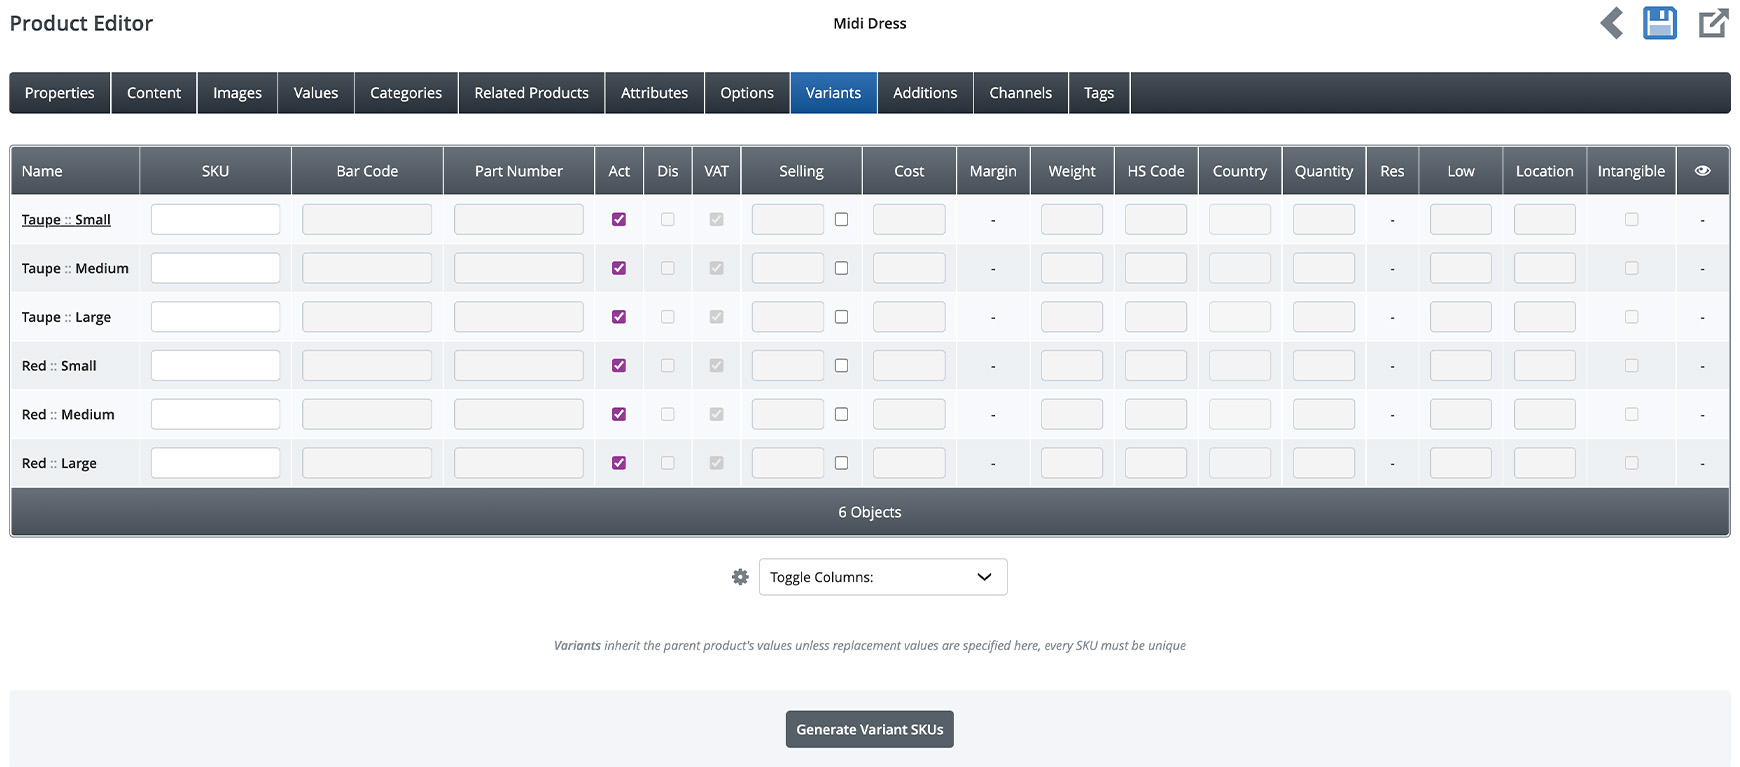
Products come in all shapes, colours and sizes. You may think you need individual products for each variation, but that's not necessary. With product Options and Variants, this allows you to offer different choices on your products, whilst maintaining the best experience for your visitors. It can also keep your products organised and much easier to find. We have covered what Options and Variants are and when you should use them within our guide Understanding Attributes, Additions, Options and Variants, which we encourage reading first. In this guide, we cover how to create Options and Variants, including examples and details about them. OptionsOptions are selectable choices for your products. Common options would be colour, size, material, finish, etc. Multiple options can be added, such as for clothing that has both colour and size options. It's always recommended to collate product information first to understand what options will be applied to your products as this helps in set up and organisation. Create/Assign optionsTo create a new option, go to the Options tab in the Product Editor. Click the SELECT dropdown, which will show a list containing CREATE NEW and any existing options already created. Choose CREATE NEW and type in a new Option title, such as Colour, into the text field that appears. This title will show on the product page. After entering an Option title, click the Create Option button and the page will now show a Values table. Here you want to enter the values for the Option, such a Black, Purple, Red, etc. One Value line will be generated already, which you can add your first Value into. To add more Value lines, type or select a Value in the text field underneath and click Create value. Once all Values have been entered, click the close X icon on the top right of the Values table. The new Option will now be assigned to the product in the Options tab. Finally, save the product by clicking the Save icon and look at the product on the front-end website. Repeat the process to add more Options if needed, for instance, our product that has two Options, Colour and Size. Both Options are set to display as Option icons only, which we will cover in the Option Editor section below. Option EditorIn the Option Editor you choose how and where your Options are displayed. You can set if the Options should be included within the Refine block, how it displays on the product page and category page. To access the Option Editor, click the Option title in the Options tab on the product or go to Products > Options in the main menu. In the Details section, tick Include in refine block if you wish to show the Option in the Refine block on category pages. Tick Minimise in refine block if you wish to minimise the Option in the Refine block. This will display the Option with the Values hidden in the Refine block initially and the customer will need to click to expand the list. It is best practice is not to tick this, to ensure all refining options are available as soon as the customer reaches the page. In the Displayed on the Product Page section, you set how the Option is displayed on the product page and whether a specified value is already selected when the customer lands on the product page or not. On the Field Type dropdown, there are four choices for how the Option will display. 1. Select field  2. Radio buttons (only for products with one Option) 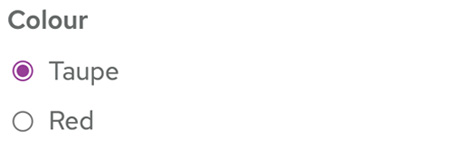 3. Option icons with select field (V2 only) 4. Option icons only (V2 only) To find out more about how to set up Option Icons, follow our guide How to use option icons. To switch your theme to a V2 theme, please have a watch of our V2 themes video overview. VariantsVariants are the combinations of your Option Values. Once you've created your Options and Values, a new tab called Variants will appear with the Variants will be created. An example of this would be, if an Option called Colour has the values of Taupe and Red, and a second Option called Size has the values of Small, Medium and Large, then the Variants would be generated on the Variants tab as shown below. By default, the Variants use the main product's data, such as price, stock level, barcode, etc. To add unique data to your Variants, you must add a unique SKU to each one. SKU's can be typed in or generated for you by clicking the Generate Variant SKUs button. If generating the SKUs, you'll need to save the product first to make the other fields editable. Once a unique SKU is added to a Variant, you can add it's own Barcode, Part Number, Selling, List and Cost prices (depending on Pricing settings), Weight, Stock Quantity, Low Stock Value, Location. It can also be set as Active, Discontinued, have VAT included and be set as Intangible (for downloadable products), where it can then have its own file assigned to it. If you're despatching to countries outside of the UK, each Variant can have its own HS Code and Country assigned to it. Variant ImagesVariants can have their own images assigned. So, when customers choose specific options, the product images changes to display the images for that Variant. You can see this on our live demo example, Midi Dress. Once you've created your Options and Variants, go to the Images tab in the Product Editor. Here, you will find a Select Parent or Variant section at the top. The Image Type dropdown lists the Variants you've created on that product. 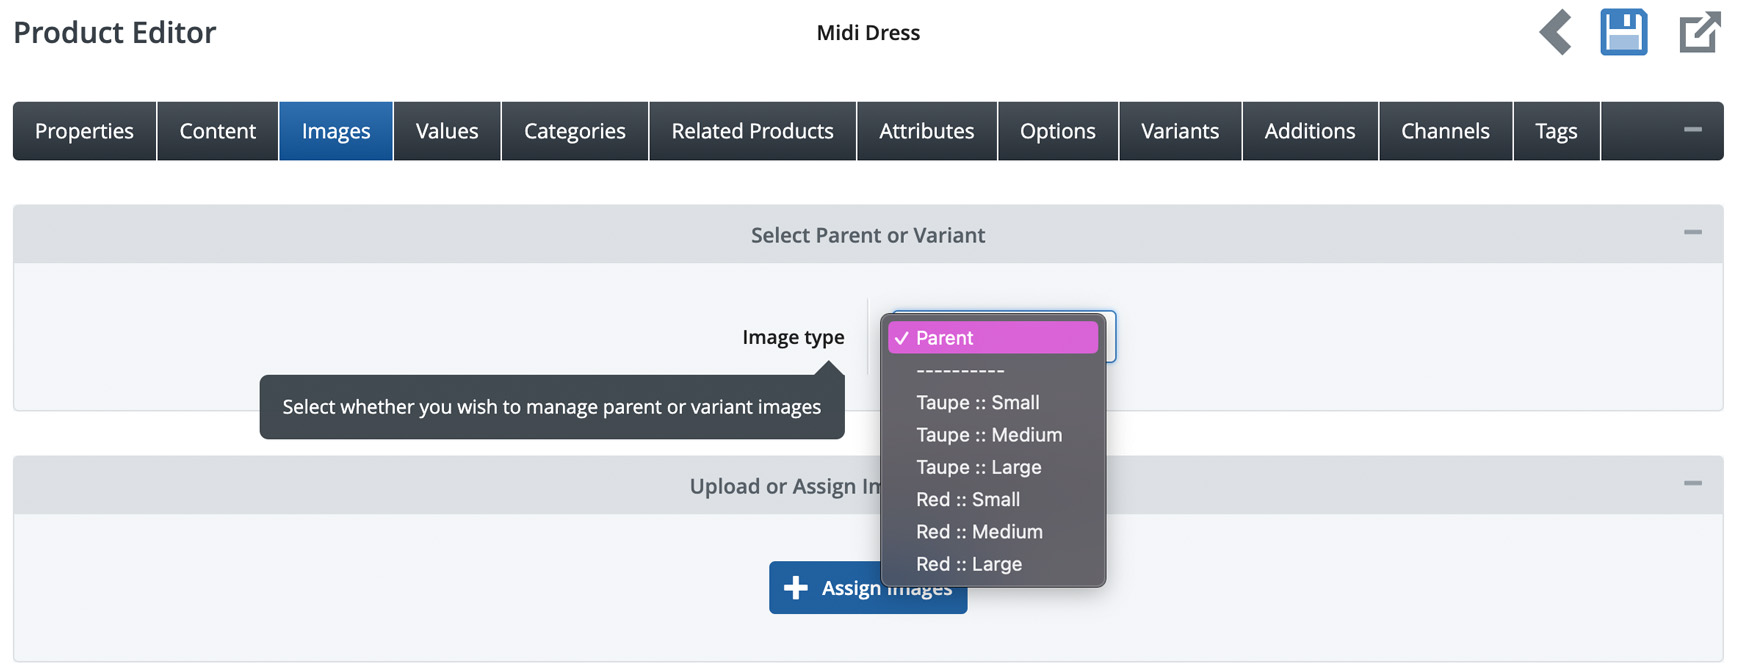 Choose a Variant from the list and click the Assign Images button to upload images for that particular Variant. Once images are uploaded for that Variant, a checkmark ✔ will appear next to the Variant in the list. This indicates that there are images assigned to that Variant. 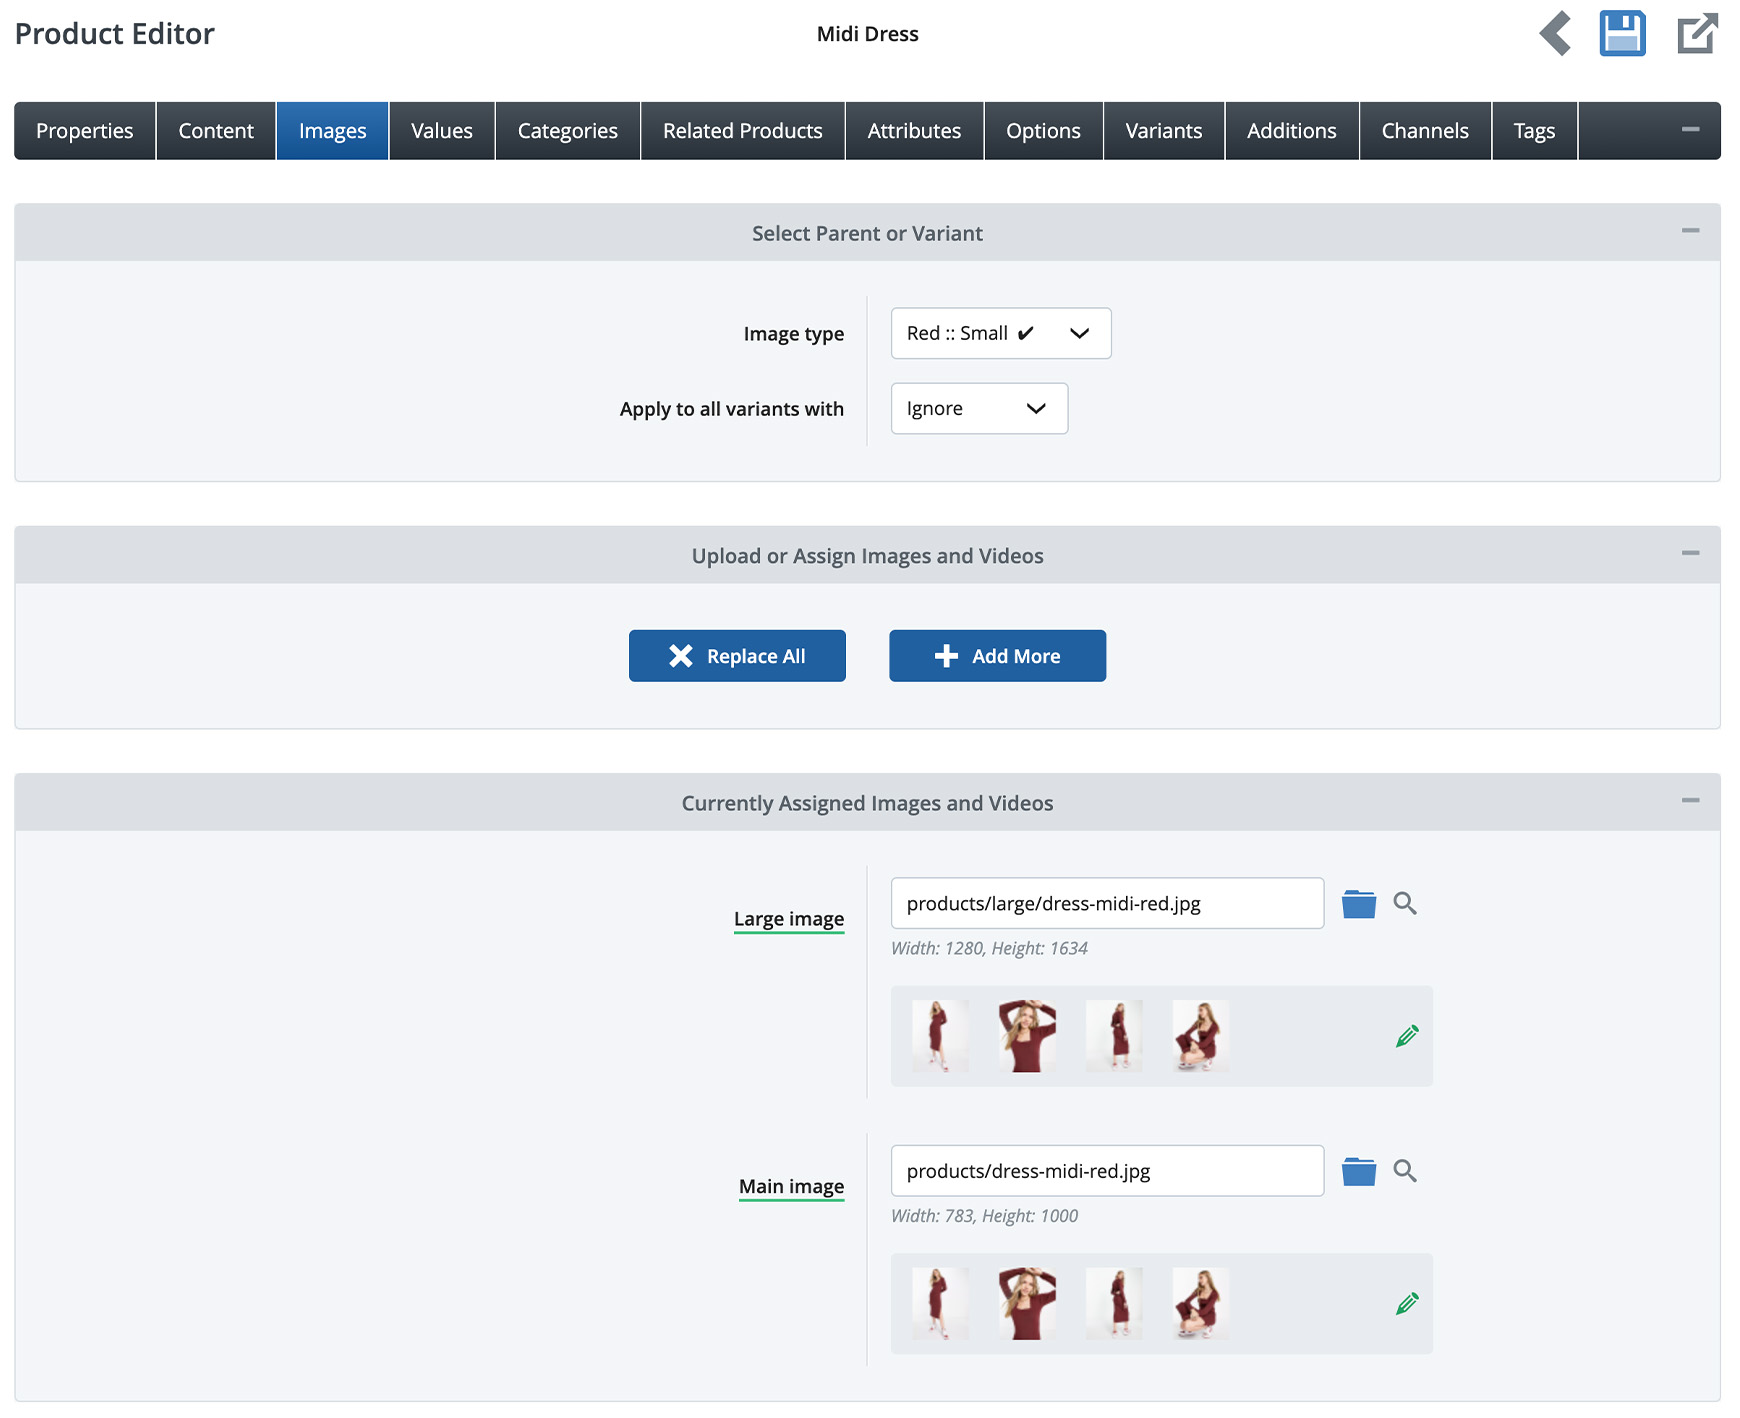 Below the Image Type option, you'll see another dropdown called Apply to all Variants with. This option can be used when the same images are to be added to the same Option Value. For example, the Midi Dress product has multiple size Option Values for the Colour: Red Option and to quickly add all the same Variant Images to all Variants of Red in one go, you'd select Colour: Red in Apply to all Variants with before uploading the Variants images. By default, Parent will be displayed first, as this would be your main product images. When using Variant images, its highly recommended to add the first Variant's images into Parent to save time having to add images to both the Parent and the first Variant. Using our Midi Dress example again, the first Option is Colour and the first value is Taupe, so the Taupe product images are assigned to the Parent. 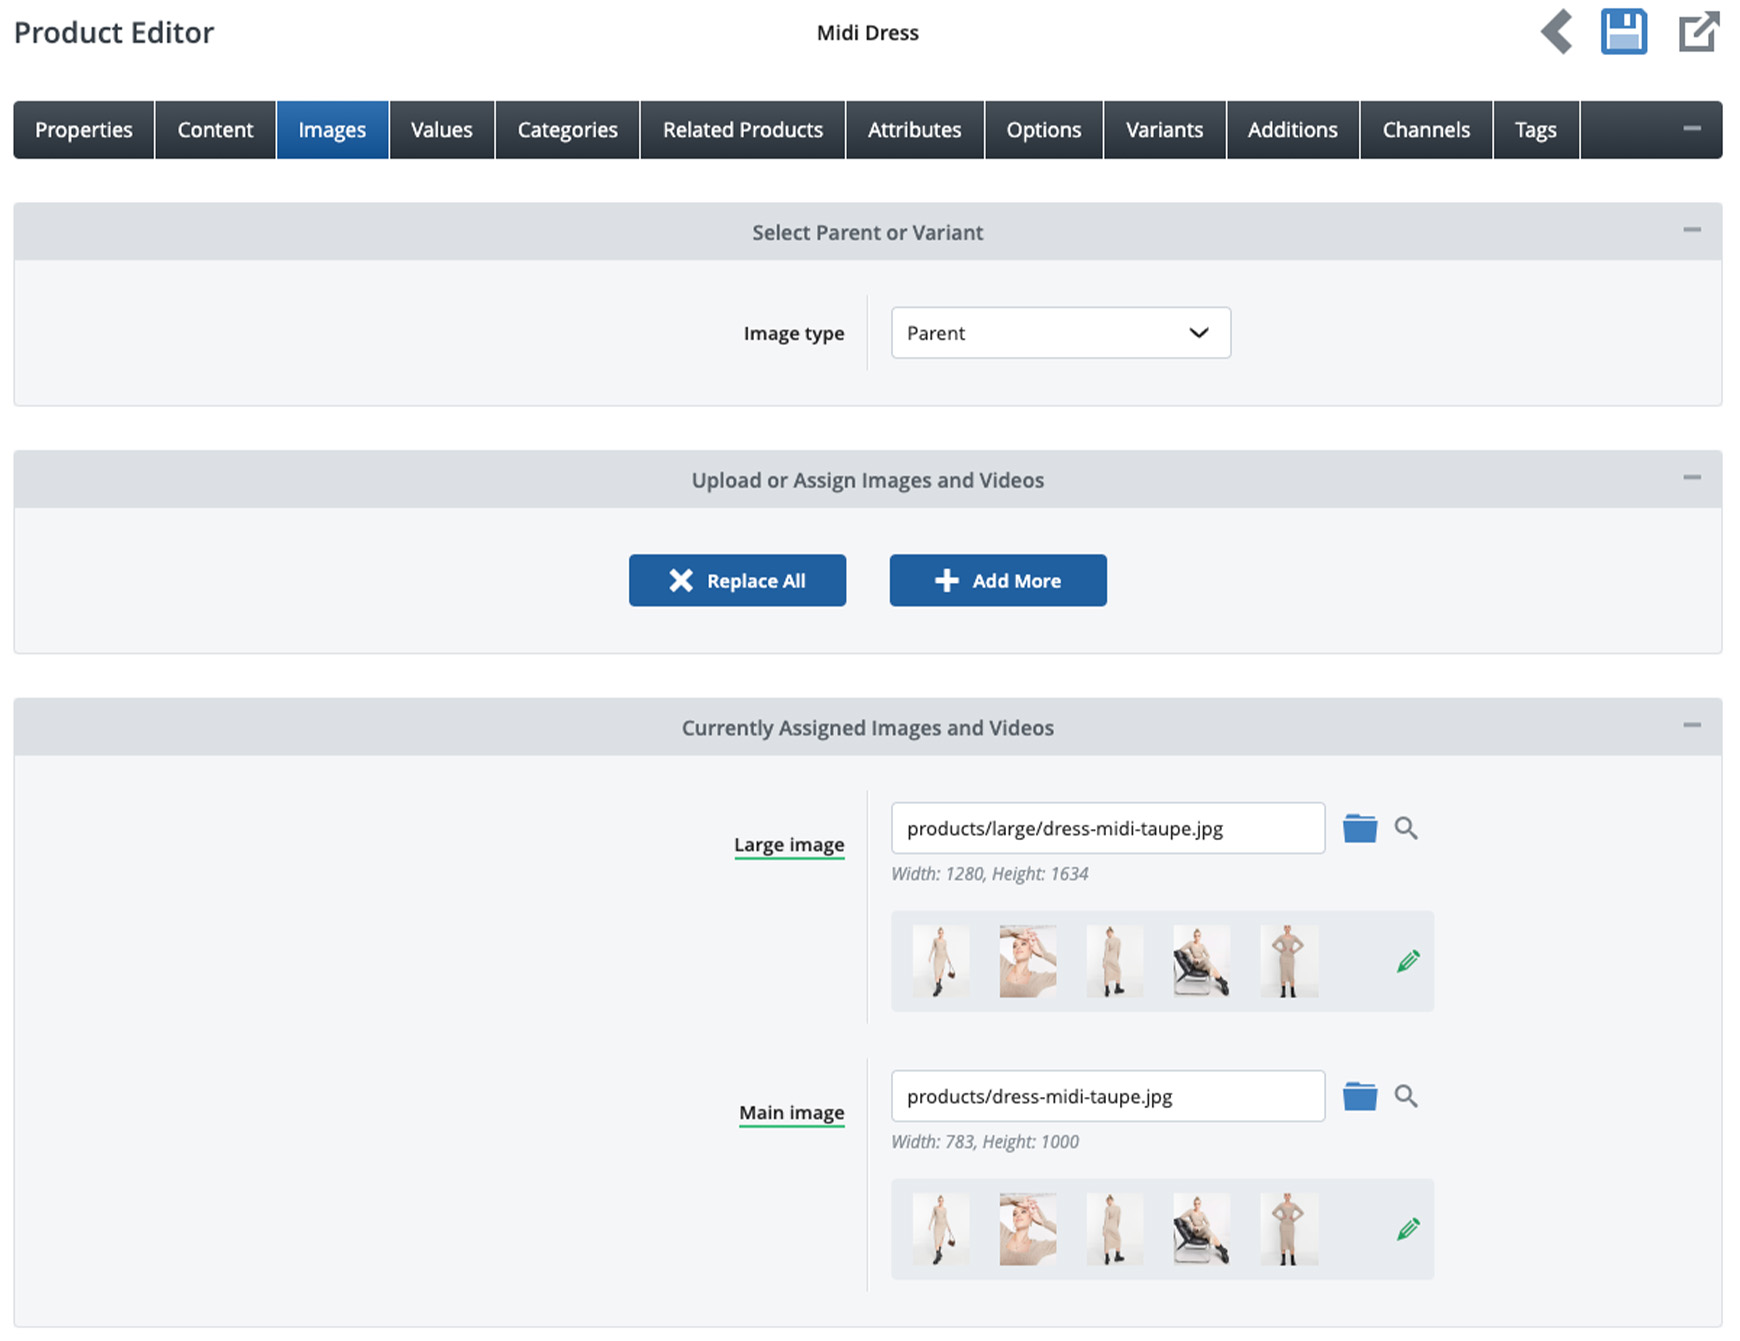 Another choice for Parent images would be images that show the product in different colours, finishes, etc. So customers can look through the images first before selecting any options. The amount of images used on the Parent and a Variant needs to be the same amount. This avoids any conflict between option choices. Other settingsIn SequenceIt is recommended to use the In Sequence setting for your Option Selection. This setting is set in Settings > Settings > Products tab > Selectable Product Options and Availability section. By setting this as In Sequence, the customer must chose their options in the order they're displayed on the product page. In our Midi Dress example, for instance, the customer must choose their colour first before choosing the size. This setting ensures information, such as stock levels and available choices, are shown as soon as each Option is selected. For example, when Red is selected on the Midi Dress, sizes 14 and 16 immediately show as out of stock. Default selection vs No default selectionThe first Value added to an option will be selected as it's Default Selection. This means that when a visitor views the product, a default variant will already be selected for the visitor. You will know what variant is the default by the Variant name being underlined on the Variants tab. If you don't want a default variant to be selected for the visitor, then go to edit the Option and, on the Properties tab, find the Displayed on the Product Page section where you can tick the No default selection option. Good to knowOn Bluepark, there is no limit to the number of Options you can create and you can add as many Options as you wish to a product. There is a limit of 500 Variants per product, so remember Variants are the combinations of the different Option Values. For instance, if you have a Colour Option with 4 colours and a Size Option with 8 sizes, this would create 32 Variants. Options and Variants can also be added to products, or updated, via our comprehensive Product Import. You can read our How to import and export products using a CSV guide for more information about uploading product data. Recommended readsLearn how to use Option Icons, including colour swatches, with Options and Variants on your product pages.  Understanding Attributes, Additions, Options and Variants Learn the difference between Attributes, Additions, Options and Variants are and how they are supposed to be used. Try Bluepark for FREE for 14 daysFull access to everything including our support team, no card details required |
|


× Create your free trialGet started for FREE for 14 daysWe recommend building your online shop on a desktop device for the best possible experienceAlready have a free trial? Sign In Now |
|